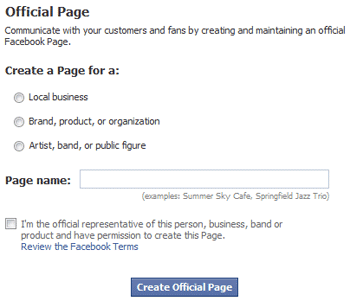
1. If you don't already have one, create a personal profile with Facebook. If you have an account already, go to Step 4.
Go to this link - http://www.facebook.com and create a personal page. You need to provide your name, birthday, and valid email address.
2. In the next 2 or 3 screens, you don't need to necessarily provide any personal information that you don't want to. You don't have to search for friends. We do recommend posting a profile picture of yourself. Click Save and Continue when you've added your profile picture.
3. Facebook will send you an email asking you to confirm your new account. Make sure you check your email, open it, and click the link and confirm the account.
4. Now that your personal profile is set up and you have access to Facebook, you can create your business page. Follow this link to start with the setup - http://www.facebook.com/pages/create.php

5. The image above is what the next screen looks like. Choose a category for your Page. If it's a non-profit, choose the second option. Give your page a name, preferably just the name of your business. Click on the checkbox. Click "Create Official Page".
6. Add a logo by hovering the mouse over the question mark, and select "Change Picture".
7. Click on the Info box and update your contact information.
8. On the left side of the screen is a box that starts with "Write something about...". Click that box to write a quick little introduction to your Facebook Page. Include a link to your website.
You are set up! You can add pictures, suggest your page to friends, promote with an ad, or link it to your Twitter account. Have fun!


No comments:
Post a Comment